
| 일 | 월 | 화 | 수 | 목 | 금 | 토 |
|---|---|---|---|---|---|---|
| 1 | ||||||
| 2 | 3 | 4 | 5 | 6 | 7 | 8 |
| 9 | 10 | 11 | 12 | 13 | 14 | 15 |
| 16 | 17 | 18 | 19 | 20 | 21 | 22 |
| 23 | 24 | 25 | 26 | 27 | 28 | 29 |
| 30 |
- EnvCommandError
- 주니어개발자역량강화
- 파이썬 |
- 항해플러스
- 코딩테스트
- 항해99
- 파이썬 int()
- 99클럽
- vscode cp949
- print("""
- 주니어개발자멘토링
- 99클럽 #99일지 #코딩테스트 #개발자스터디 #항해 #til
- 99일지
- Til
- 백준
- 항해
- fatal:not a git repository
- 코딩부트캠프후기
- 개발자스터디
- 파이썬 map 함수
- print sep
- Fatal Python error: init_fs_encoding: failed to get the Python codec of the filesystem encoding
- 파이썬
- 개발자사이드프로젝트
- MomentumParameters
- 파이썬 sep
- 파이썬 클래스
- cp949
- 10430번
- not a git repository
- Today
- Total
선발대
[스파르타] 웹 프로그래밍 A-Z 기초 1주차 (완강) 본문
1. 수업 후기
- 강의 개수: 16개
- 총 강의시간: 108분 14초 (1시간 48분 14초)
- 수업 목표:
- 1. 서버와 클라이언트의 역할에 대해서 이해한다.
- 2. HTML, CSS 기초 지식을 이해한다. 부트스트랩을 가져다 쓸 줄 안다!
- 3. Javascript 기초 문법을 익힌다.
각 강의가 최대 10분 정도라서 짧은 호흡으로 이해하기 편했다. 그래도 코딩의 기초만 알다 보니 조금이라도 응용된 내용이 나오면 강의 내용을 여러 번 듣고 개념을 이해해야 했다. 각 과제물의 난이도는 어렵지 않았고, 기존 강의 내용을 잘 들으면 쉽게 풀이할 수 있었다. 반나절 정도면 1주차 완강 가능하다. 솔직히 반나절도 조금 오래 걸린 것 같다. 나는 수업을 듣고 정리하면서 하느라 시간이 오래 걸렸는데, 바로 이해하고 과제물을 곧바로 풀이하면 더 빠르게 끝낼 수 있을 것 같다.
코딩은 외우는 것이 아니라, 직접 적용하고 체득해 나가는 것을 어렴풋이 깨닫게 되었다. 각 주차가 끝나면 개발일지 제출이 필요한데, 점차 작성해나가면서 보완해야 할 부분을 찾아야겠다. 아직 기초 부분이라서 그런지 재미있다. 비전공자로서 차차 열심히 지식을 넓혀나가야겠다. 화이팅~
2. 수업내용 정리
1-1. 1주차 오늘 배울 것
01. 서버 / 클라이언트 / 웹의 동작 개념
- 브라우저의 역할:
- 1. 서버(네이버 컴퓨터)에 요청하는 것,
- 2. 가져와서 보여주는 것
- HTML: 뼈대, CSS: 꾸미는 것, JS: 움직이기
1-2. 필수 프로그램 설치
01. PyCharm Professional 설치 가이드
Download PyCharm: Python IDE for Professional Developers by JetBrains
Download the latest version of PyCharm for Windows, macOS or Linux.
www.jetbrains.com
02. JetBrains 회원가입 가이드
JetBrains Account
account.jetbrains.com
03. PyCharm Professional 등록 가이드
- 주어진 코드로 등록 완료
04. AWS 가입하기
AWS Console - Signup
portal.aws.amazon.com
1-3. HTML, CSS 기본 내용
01. HTML과 CSS의 개념
- HTML: 구역과 텍스트를 나타내는 코드
- CSS: 잡은 구역을 꾸며주는 것
02. HTML 기초
- 크게 head와 body로 구성됨
- <head>: 페이지의 속성 정보, 눈에 안 보이는 필요한 것들 있는 곳. ex) meta, script, link, title 등
- <body>: 페이지의 내용
<!DOCTYPE html>
<html lang = "en">

<head>
	<meta charset = "UTF-8">
    <meta name = "viewport" content = "width = device - width, initial - scale = 1.0">
    <title>스파르타코딩클럽 | HTML 기초</title>
</head>

<body>
	<!-- 구역 나누는 태그 -->
    <div> 구역 나누기 </div>
    <p> 문단 태그 </p>
    <ul>
    	<li> bullet point! 1 </li>
        <li> bullet point! 2 </li>
    </ul>

    <!-- 구역 내 콘텐츠 태그들 -->
    <h1> 제목 태그. 구글 검색에 걸리도록 페이지마다 하나씩 써주기 </h1>
    <h2> 소제목 </h2>
    <h3> 비중 작은 태그들 </h3>
    <hr>
    span 태그: 특정 <span style = "color:red">글자</span> 꾸밀 때 사용
    <hr>
    a 태그: <a href = "http://naver.com/"> 하이퍼링크 </a>
    <hr>
    img 태그: <img scr = "http://www.google.com/images/~이미지 주소" />
    <hr>
    input 태그: <input type = "text" />
    <hr>
    button 태그: <button> 버튼입니다 </button>
    <hr>
    textarea 태그: <textarea> 나는 무엇일까요? </textarea>
</body>

</html>
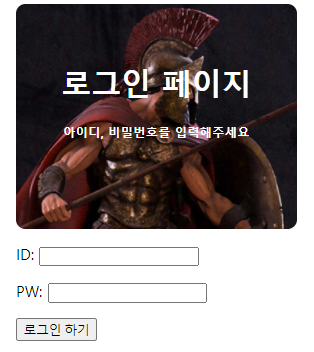
1-4. Quiz_간단한 로그인 페이지 만들어보기
01. [실습] 간단한 로그인 페이지 만들기

<!DOCTYPE html>
<html lang="en">
<head>
    <meta charset="UTF-8">
    <title>로그인 페이지</title>
</head>
<body>
    <h1>로그인 페이지</h1>
    <p>ID: <input type="text"/></p>
    <p>PW: <input type="text"/></p>
    <button>로그인 하기</button>
</body>
</html>
1-5. CSS 기초
01. HTML 부모-자식 구조 살펴보기
<div>
<div>
<button>나는 버튼1</button>
<div>
<div>
<button>나는 버튼2</button>
</div>
</div>
- 박스를 옮기면 내용물도 같이 옮겨지는 원리.
02. CSS 기초
- CSS 사용법: <head> 태그 안의 <style> 태그에서 사용
- 클래스 사용법: 클래스가 mytitle이면 .mytitle{ ... }으로 사용
<!DOCTYPE html>
<html lang="en">
<head>
    <meta charset="UTF-8">
    <title>로그인 페이지</title>
    <stlye>
    	.mytitle {
        	color: red;
        }
    </style>
</head>
<body>
    <h1 class = "mytitle">로그인 페이지</h1>
    <p>ID: <input type="text"/></p>
    <p>PW: <input type="text"/></p>
    <button>로그인 하기</button>
</body>
</html>
- 자주 쓰는 CSS 정리:
| 배경관련 | background-color background-image background-size |
| 사이즈 | width height |
| 폰트 | font-size font-weight font-family color |
| 간격 | margin padding |
1-6. 자주 쓰이는 CSS 연습하기
01. 자주 쓰이는 CSS 연습하기
- margin: 바깥 여백, padding: 안쪽 여백
<!DOCTYPE html>
<html lang="en">
<head>
    <meta charset="UTF-8">
    <title>로그인 페이지</title>
    <style>
        .mytitle {
            color: white;
            width: 300px;
            height: 200px;

            /* 배경은 항상 3줄 붙어다님 */
            background-image: url('https://www.ancient-origins.net/sites/default/files/field/image/Agesilaus-II-cover.jpg');
            background-position: center; /* 이미지 위치 조정 */
            background-size: cover; /* 이미지 크기 조절 */

            border-radius: 10px; /* 이미지 귀퉁이 */
            text-align: center; /* 글씨 가운데 정렬 */
            padding-top: 40px
        }

        .wrap{
            margin: 10px auto; /* auto: 상하좌우 최대한 밀어라 */
            width: 300px; /* 양쪽 여백 균등하게 주기 위해 크기 조절 */
        }
    </style>
</head>
<body>
<div class="wrap">
    <div class="mytitle">
        <h1>로그인 페이지</h1>
        <h5>아이디, 비밀번호를 입력해주세요</h5>
    </div>
    <p>ID: <input type="text"/></p>
    <p>PW: <input type="text"/></p>
    <button>로그인 하기</button>
</div>
</body>
</html>
1-7. 폰트, 주석, 파일분리
01. 구글 웹폰트 입히기
Google Fonts
Making the web more beautiful, fast, and open through great typography
fonts.google.com
- 폰트 고르기 > Select this style > 우측 상단 모음아이콘 > Embed > link 태그는 <head>, CSS는 <style>로.
- * {...} : 모든 태그에 적용됨.
<!-- 추가된 부분만 기록 -->

<!DOCTYPE html>
<html lang="en">
<head>
    <meta charset="UTF-8">
    <title>로그인 페이지</title>
    <link href="https://fonts.googleapis.com/css2?family=East+Sea+Dokdo&display=swap" rel="stylesheet">
    <style>
        * {
            font-family: 'East Sea Dokdo', cursive;
        }
02. 꿀팁! 주석 달기
- 단축키: 라인 선택 후 Ctrl(또는 command) + /
- html, css, js 마다 다른 형태의 주석임
03. CSS 파일 분리
- <style> 태그 분리하기
<!-- style.css 파일을 같은 폴더에 만들고, head 태그에서 불러오기 -->
<link rel="stylesheet" type="text/css" href = "(css파일이름).css">
1-8. 부트스트랩, 예쁜 CSS 모음집
01. Bootstrap이란?
- 부트스트랩: 이미 완성된 CSS를 모아둔 것
02. Bootstrap - 시작 템플릿
<!doctype html>
<html lang="en">

<head>
<meta charset="utf-8">
<meta name="viewport" content="width=device-width, initial-scale=1, shrink-to-fit=no">

<link href="https://cdn.jsdelivr.net/npm/bootstrap@5.0.2/dist/css/bootstrap.min.css" rel="stylesheet"
integrity="sha384-EVSTQN3/azprG1Anm3QDgpJLIm9Nao0Yz1ztcQTwFspd3yD65VohhpuuCOmLASjC" crossorigin="anonymous">
<script src="https://ajax.googleapis.com/ajax/libs/jquery/3.5.1/jquery.min.js"></script>
<script src="https://cdn.jsdelivr.net/npm/bootstrap@5.0.2/dist/js/bootstrap.bundle.min.js"
integrity="sha384-MrcW6ZMFYlzcLA8Nl+NtUVF0sA7MsXsP1UyJoMp4YLEuNSfAP+JcXn/tWtIaxVXM"
crossorigin="anonymous"></script>

<title>스파르타코딩클럽 | 부트스트랩 연습하기</title>
</head>

<body>
<h1>이걸로 시작해보죠!</h1>
</body>

</html>
- 부트스트랩 컴포넌트 5.0: https://getbootstrap.com/docs/5.0/components/buttons/
Buttons
Use Bootstrap’s custom button styles for actions in forms, dialogs, and more with support for multiple sizes, states, and more.
getbootstrap.com
1-9. CSS 꿀팁 한번 더 배우기
01. Bootstrap을 쓰기 전에 - CSS 꿀팁 한번 더 배우기!

02. 폰트 넣기

<!doctype html>
<html lang="en">

<head>
    <meta charset="utf-8">
    <meta name="viewport" content="width=device-width, initial-scale=1, shrink-to-fit=no">

    <link href="https://cdn.jsdelivr.net/npm/bootstrap@5.0.2/dist/css/bootstrap.min.css" rel="stylesheet"
          integrity="sha384-EVSTQN3/azprG1Anm3QDgpJLIm9Nao0Yz1ztcQTwFspd3yD65VohhpuuCOmLASjC" crossorigin="anonymous">
    <script src="https://ajax.googleapis.com/ajax/libs/jquery/3.5.1/jquery.min.js"></script>
    <script src="https://cdn.jsdelivr.net/npm/bootstrap@5.0.2/dist/js/bootstrap.bundle.min.js"
            integrity="sha384-MrcW6ZMFYlzcLA8Nl+NtUVF0sA7MsXsP1UyJoMp4YLEuNSfAP+JcXn/tWtIaxVXM"
            crossorigin="anonymous"></script>

    <title>스파르타코딩클럽 | 부트스트랩 연습하기</title>
    <link href="https://fonts.googleapis.com/css2?family=Gowun+Dodum&display=swap" rel="stylesheet">

    <style>
        * {
            font-family: 'Gowun Dodum', sans-serif;
        }

        .mytitle {
            background-color: green;
            height: 250px;
            width: 100%;

            background-image: linear-gradient(0deg, rgba(0, 0, 0, 0.5), rgba(0, 0, 0, 0.5)), url('https://movie-phinf.pstatic.net/20210715_95/1626338192428gTnJl_JPEG/movie_image.jpg');
            background-position: center;
            background-size: cover;

            color: white;

            /* 이미지 안의 글씨들 가운데 정렬, 4줄씩 붙어다님 */
            display: flex;
            flex-direction: column; /* row는 옆으로 주르륵 나옴 */
            justify-content: center;
            align-items: center;
        }

        .mytitle > button {
            width: 200px;
            height: 50px;

            background-color: transparent;
            color: white;

            border-radius: 50px;
            border: 1px solid white;

            margin-top: 10px;

        }

        .mytitle > button:hover { /* hover: 마우스를 올렸을 때 */
            border: 2px solid white;

        }
    </style>
</head>

<body>
<div class="mytitle">
    <h1>내 생에 최고의 영화들</h1>
    <button>영화 기록하기</button>
</div>
</body>

</html>
1-10. 본격 부트스트랩 써보기
01. Bootstrap 본격적으로 써보기
- 이모티콘 모음 사이트: https://kr.piliapp.com/facebook-symbols/
페이스 북 기호 : 웃는 기호, 이모티콘 기호, 이모티콘과 코드 목록
× 이모지 - 이모티콘 혹은 웃는 얼굴이라고도 불립니다. iOS와 Android는 기본적으로 845개의 이모티콘을 지원하고 있으며, 페이스북은 하트/사랑 기호, 별, 부호 및 동물 모양을 포함한 절반을 지원
kr.piliapp.com
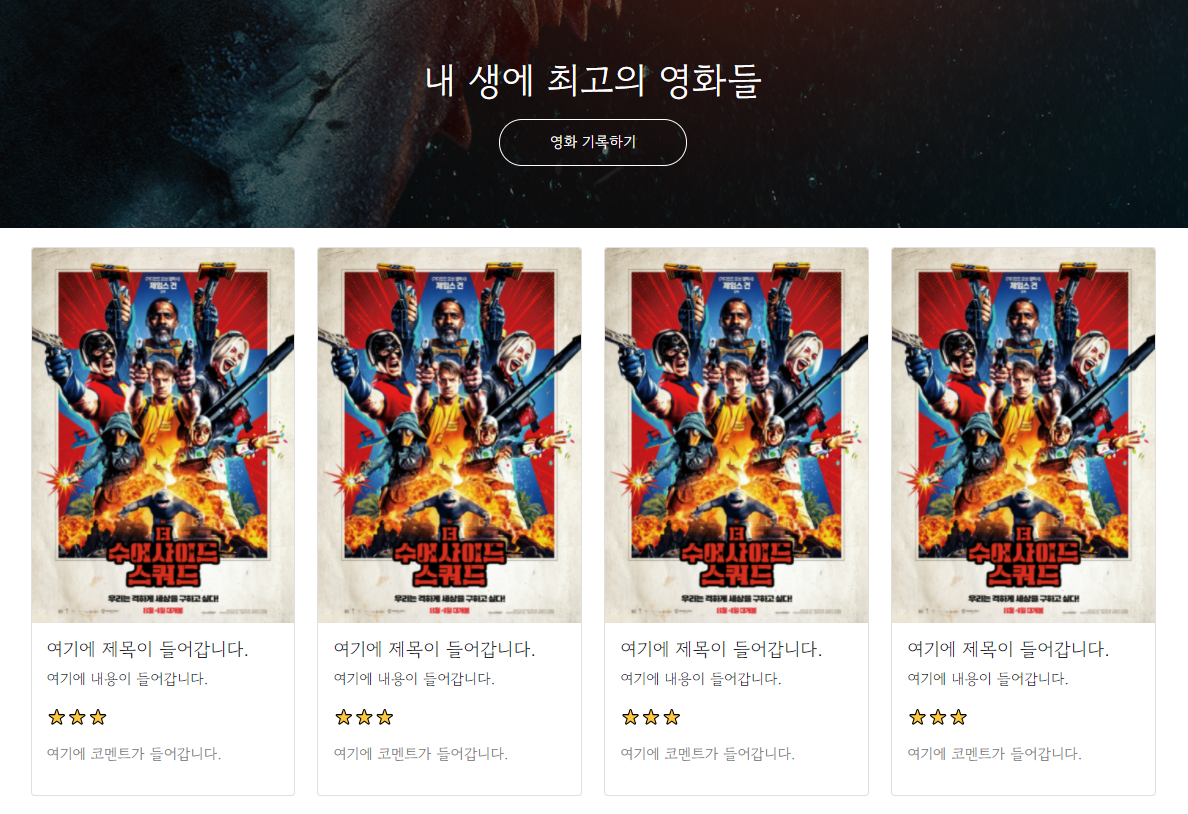
<!doctype html>
<html lang="en">

<head>
    <meta charset="utf-8">
    <meta name="viewport" content="width=device-width, initial-scale=1, shrink-to-fit=no">

    <link href="https://cdn.jsdelivr.net/npm/bootstrap@5.0.2/dist/css/bootstrap.min.css" rel="stylesheet"
          integrity="sha384-EVSTQN3/azprG1Anm3QDgpJLIm9Nao0Yz1ztcQTwFspd3yD65VohhpuuCOmLASjC" crossorigin="anonymous">
    <script src="https://ajax.googleapis.com/ajax/libs/jquery/3.5.1/jquery.min.js"></script>
    <script src="https://cdn.jsdelivr.net/npm/bootstrap@5.0.2/dist/js/bootstrap.bundle.min.js"
            integrity="sha384-MrcW6ZMFYlzcLA8Nl+NtUVF0sA7MsXsP1UyJoMp4YLEuNSfAP+JcXn/tWtIaxVXM"
            crossorigin="anonymous"></script>

    <title>스파르타코딩클럽 | 부트스트랩 연습하기</title>
    <link href="https://fonts.googleapis.com/css2?family=Gowun+Dodum&display=swap" rel="stylesheet">

    <style>
        * {
            font-family: 'Gowun Dodum', sans-serif;
        }

        .mytitle {
            background-color: green;
            height: 250px;
            width: 100%;

            background-image: linear-gradient(0deg, rgba(0, 0, 0, 0.5), rgba(0, 0, 0, 0.5)), url('https://movie-phinf.pstatic.net/20210715_95/1626338192428gTnJl_JPEG/movie_image.jpg');
            background-position: center;
            background-size: cover;

            color: white;

            /* 이미지 안의 글씨들 가운데 정렬, 4줄씩 붙어다님 */
            display: flex;
            flex-direction: column; /* row는 옆으로 주르륵 나옴 */
            justify-content: center;
            align-items: center;
        }

        .mytitle > button {
            width: 200px;
            height: 50px;

            background-color: transparent;
            color: white;

            border-radius: 50px;
            border: 1px solid white;

            margin-top: 10px;
        }

        .mytitle > button:hover { /* hover: 마우스를 올렸을 때 */
            border: 2px solid white;
        }

        .mycomment {
            color: gray
        }

        .wrap {
            width: 1200px;
            margin: 20px auto 0px auto;
        }
    </style>
</head>

<body>
    <div class="mytitle">
        <h1>내 생에 최고의 영화들</h1>
        <button>영화 기록하기</button>
    </div>
    <div class="wrap">
        <div class="row row-cols-1 row-cols-md-4 g-4">
            <div class="col">
                <div class="card h-100">
                    <img src="https://movie-phinf.pstatic.net/20210728_221/1627440327667GyoYj_JPEG/movie_image.jpg"
                         class="card-img-top" alt="...">
                    <div class="card-body">
                        <h5 class="card-title">여기에 제목이 들어갑니다.</h5>
                        <p class="card-text">여기에 내용이 들어갑니다.</p>
                        <p>⭐⭐⭐</p>
                        <p class="mycomment">여기에 코멘트가 들어갑니다.</p>
                    </div>
                </div>
            </div>
        </div>
    </div>

</body>

</html>
1-11. Quiz_포스팅박스를 완성하기!
01. [실습] 포스팅 박스 넣어보기
- div 편집할 때는 background-color 주고 시작.

02. 약간의 모바일 처리를 해두기
- max-width: 500px;
- width: 95%;
<!doctype html>
<html lang="en">

<head>
    <meta charset="utf-8">
    <meta name="viewport" content="width=device-width, initial-scale=1, shrink-to-fit=no">

    <link href="https://cdn.jsdelivr.net/npm/bootstrap@5.0.2/dist/css/bootstrap.min.css" rel="stylesheet"
          integrity="sha384-EVSTQN3/azprG1Anm3QDgpJLIm9Nao0Yz1ztcQTwFspd3yD65VohhpuuCOmLASjC" crossorigin="anonymous">
    <script src="https://ajax.googleapis.com/ajax/libs/jquery/3.5.1/jquery.min.js"></script>
    <script src="https://cdn.jsdelivr.net/npm/bootstrap@5.0.2/dist/js/bootstrap.bundle.min.js"
            integrity="sha384-MrcW6ZMFYlzcLA8Nl+NtUVF0sA7MsXsP1UyJoMp4YLEuNSfAP+JcXn/tWtIaxVXM"
            crossorigin="anonymous"></script>

    <title>스파르타코딩클럽 | 부트스트랩 연습하기</title>
    <link href="https://fonts.googleapis.com/css2?family=Gowun+Dodum&display=swap" rel="stylesheet">

    <style>
        * {
            font-family: 'Gowun Dodum', sans-serif;
        }

        .mytitle {
            background-color: green;
            height: 250px;
            width: 100%;

            background-image: linear-gradient(0deg, rgba(0, 0, 0, 0.5), rgba(0, 0, 0, 0.5)), url('https://movie-phinf.pstatic.net/20210715_95/1626338192428gTnJl_JPEG/movie_image.jpg');
            background-position: center;
            background-size: cover;

            color: white;

            /* 이미지 안의 글씨들 가운데 정렬, 4줄씩 붙어다님 */
            display: flex;
            flex-direction: column; /* row는 옆으로 주르륵 나옴 */
            justify-content: center;
            align-items: center;
        }

        .mytitle > button {
            width: 200px;
            height: 50px;

            background-color: transparent;
            color: white;

            border-radius: 50px;
            border: 1px solid white;

            margin-top: 10px;
        }

        .mytitle > button:hover { /* hover: 마우스를 올렸을 때 */
            border: 2px solid white;
        }

        .mycomment {
            color: gray
        }

        .wrap {
            max-width: 1200px;
            width: 95%;
            margin: 20px auto 0px auto;
        }

        .mypost {
            max-width: 500px;
            width: 95%;
            margin: 20px auto 0px auto;
            box-shadow: 0px 0px 3px 0px gray;
            padding: 20px;
        }

        .mybtn {
            display: flex;
            flex-direction: row;
            justify-content: center;
            align-items: center;

            margin-top: 10px;
        }

        .mybtn > button {
            margin-right: 10px;
        }


    </style>
</head>

<body>

<div class="mytitle">
    <h1>내 생에 최고의 영화들</h1>
    <button>영화 기록하기</button>
</div>

<div class="mypost">
    <div class="form-floating mb-3">
        <input type="email" class="form-control" id="floatingInput" placeholder="name@example.com">
        <label for="floatingInput">영화URL</label>
    </div>
    <div class="input-group mb-3">
        <label class="input-group-text" for="inputGroupSelect01">별점</label>
        <select class="form-select" id="inputGroupSelect01">
            <option selected>-- 선택하기 --</option>
            <option value="1">⭐</option>
            <option value="2">⭐⭐</option>
            <option value="3">⭐⭐⭐</option>
            <option value="4">⭐⭐⭐⭐</option>
            <option value="5">⭐⭐⭐⭐⭐</option>
        </select>
    </div>
    <div class="form-floating">
        <textarea class="form-control" placeholder="Leave a comment here" id="floatingTextarea2"
                  style="height: 100px"></textarea>
        <label for="floatingTextarea2">코멘트</label>
    </div>
    <div class="mybtn">
        <button type="button" class="btn btn-dark">기록하기</button>
        <button type="button" class="btn btn-outline-dark">닫기</button>
    </div>


</div>

<div class="wrap">
    <div class="row row-cols-1 row-cols-md-4 g-4">
        <div class="col">
            <div class="card h-100">
                <img src="https://movie-phinf.pstatic.net/20210728_221/1627440327667GyoYj_JPEG/movie_image.jpg"
                     class="card-img-top" alt="...">
                <div class="card-body">
                    <h5 class="card-title">여기에 제목이 들어갑니다.</h5>
                    <p class="card-text">여기에 내용이 들어갑니다.</p>
                    <p>⭐⭐⭐</p>
                    <p class="mycomment">여기에 코멘트가 들어갑니다.</p>
                </div>
            </div>
        </div>
    </div>
</div>

</body>

</html>
1-12. Javascript 맛보기
01. 자바스크립트란?
- 자바스크립트: 프로그래밍 언어 중 하나로, 브라우저가 알아들을 수 있는 언어.
- 이미 만들어진 표준: 모든 웹서버는 HTML + CSS + Javascript 를 준다.
- Java와 이름만 비슷할 뿐 전혀 관련없음.
02. 자바스크립트 기초
03. 자바스크립트 - HTML 연결 버튼을 클릭하면 경고창이 뜨게 하기
- 자바스크립트 사용법: <head> 안의 <script> 태그에서 사용.
1-13. Javascript 기초 문법 배우기 (1)
01. 본격적으로 문법을 배워볼까요?
- [크롬 개발자도구] > console 탭 작성 (단축키: F12)
- 띄어놓은 페이지에서 개발자들이 자바스크립트를 빠르게 테스트할 수 있도록 만든 도구.
- 프로그래밍 언어 배울 때 기억해야 할 5가지: 변수, 자료형, 함수, 조건문, 반복문
- 변수 & 기본연산, 사칙연산, 문자열 더하기
- 리스트: 순서를 지켜서 가지고 있는 형태
- 리스트 정의: let 리스트 = ['...', '...', ...]
- 리스트 요소 추가: 리스트.push('요소')
- 리스트 안에 리스트 넣을 수 있음. 그러면 바깥쪽 리스트의 몇 번째에 리스트가 있고 또 그 안의...
- 딕셔너리: 키(Key) - 밸류(Value) 값의 묶음
- 딕셔너리 정의: let 딕셔너리 = {'키' : '밸류', ...}
- 딕셔너리 호출: 딕셔너리['키'], 결과: '밸류'
- 딕셔너리 추가: 딕셔너리['새로운 키'] = 밸류
- 리스트와 딕셔너리 조합도 가능
- 필요한 이유: 순서 표시 및 정보 묶기 가능
- 기본함수들: 구글에 찾아보면 많이 나옴
- let myemail = 'sparta@gmail.com'
- myemail.split('@')[1].split('.')[0], 결과: gmail
1-14. Javascript 기초 문법 배우기 (2)
01. 더 본격적으로 문법을 배워볼까요!
- 함수
/* 함수 생성 */
function 함수명(필요한 변수들) {
	내릴 명령들
}

/* 함수 사용 */
함수이름(필요한 변수들)

/* 예시 */
function sum(a,b) {
	alert(a+b)
    // console.log 하면 콘솔창에서 확인 가능.
	return a+b
}
let result = sum(2, 3)
alert(result)
- 조건문
if(조건){
	명령
} else{
	명령
}
- 반복문
let a_list = ['사과', '배', '감', '딸기']
for (let i = 0; i < a_list.length; i++) {
	console.log(a_list[i])
    }


let 리스트 = [
	{'키1': 밸류1, 키2': 밸류2},
    ...
]
for (let i = 0; i < 리스트.length; i++) {
	console.log(리스트[i]['키1']) // 이렇게 하면 밸류1 반복 출력됨
}
1-15. Javascript 연습하기
01. 전형적인 패턴 함께 연습하기
02. 앗, 문법이 어렵다고요?
for (let i = 0; i < mise_list.length; i++) {
	if (mise_list[i]['IDEX_MVL'] < 40) {
		console.log(mise_list[i]['MSRSTE_NM'])
	}
}
1-16. 1주차 끝 & 숙제 설명
01. 1주차 숙제

<!doctype html>
<html lang="en">

<head>
    <meta charset="utf-8">
    <meta name="viewport" content="width=device-width, initial-scale=1, shrink-to-fit=no">

    <link href="https://cdn.jsdelivr.net/npm/bootstrap@5.0.2/dist/css/bootstrap.min.css" rel="stylesheet"
          integrity="sha384-EVSTQN3/azprG1Anm3QDgpJLIm9Nao0Yz1ztcQTwFspd3yD65VohhpuuCOmLASjC" crossorigin="anonymous">
    <script src="https://ajax.googleapis.com/ajax/libs/jquery/3.5.1/jquery.min.js"></script>
    <script src="https://cdn.jsdelivr.net/npm/bootstrap@5.0.2/dist/js/bootstrap.bundle.min.js"
            integrity="sha384-MrcW6ZMFYlzcLA8Nl+NtUVF0sA7MsXsP1UyJoMp4YLEuNSfAP+JcXn/tWtIaxVXM"
            crossorigin="anonymous"></script>

    <title>스파르타코딩클럽 | 부트스트랩 연습하기</title>
    <link href="https://fonts.googleapis.com/css2?family=East+Sea+Dokdo&display=swap" rel="stylesheet">
    <style>
        * {
            font-family: 'East Sea Dokdo', cursive;
            font-size: 25px
        }
        .mytitle {
            height: 400px;
            width: 100%;

            background-image: linear-gradient(0deg, rgba(0, 0, 0, 0.5), rgba(0, 0, 0, 0.5)), url('http://img.tf.co.kr/article/home/2021/12/01/202156781638339560.jpg');
            background-position: center top;
            background-size: cover;

            color: white;

            display: flex;
            flex-direction: column;
            justify-content: center;
            align-items: center;
        }

        .mypost {
            max-width: 500px;
            width: 95%;
            margin: 20px auto 20px auto;
            box-shadow: 0px 0px 3px 0px gray;
            padding: 20px;
        }

        .mybtn {
            display: flex;
            flex-direction: row;
            justify-content: left;
            align-items: center;
            margin: 20px auto 0px auto;
        }

        .card {
            max-width: 500px;
            width: 95%;
            margin: 20px auto 20px auto;
        }

    </style>
</head>

<body>

<div class="mytitle">
    <h1>IVE(아이브) 팬명록</h1>
</div>

<div class="mypost">
    <div class="form-floating mb-3">
        <input type="email" class="form-control" id="floatingInput" placeholder="name@example.com">
        <label for="floatingInput">닉네임</label>
    </div>
    <div class="form-floating">
        <textarea class="form-control" placeholder="Leave a comment here" id="floatingTextarea2"
                  style="height: 100px"></textarea>
        <label for="floatingTextarea2">응원댓글</label>
    </div>
    <div class="mybtn">
        <button type="button" class="btn btn-dark">응원남기기</button>
    </div>
</div>

<div class="card">
    <div class="card-body">
        <blockquote class="blockquote mb-0">
            <p>새로운 앨범 너무 멋지다!</p>
            <footer class="blockquote-footer">식빵맨 <cite title="Source Title">Mr.Bread</cite></footer>
        </blockquote>
    </div>
</div>
<div class="card">
    <div class="card-body">
        <blockquote class="blockquote mb-0">
            <p>새로운 앨범 너무 멋지다!</p>
            <footer class="blockquote-footer">식빵맨 <cite title="Source Title">Mr.Bread</cite></footer>
        </blockquote>
    </div>
</div>
<div class="card">
    <div class="card-body">
        <blockquote class="blockquote mb-0">
            <p>새로운 앨범 너무 멋지다!</p>
            <footer class="blockquote-footer">식빵맨 <cite title="Source Title">Mr.Bread</cite></footer>
        </blockquote>
    </div>
</div>
</body>

</html>'스파르타코딩클럽 > 강의 정리' 카테고리의 다른 글
| [스파르타] 웹 프로그래밍 A-Z 기초 5주차 (완강) (0) | 2021.12.16 |
|---|---|
| [스파르타] 웹 프로그래밍 A-Z 기초 4주차 (완강) (0) | 2021.12.16 |
| [스파르타] 웹 프로그래밍 A-Z 기초 3주차 (완강) (0) | 2021.12.15 |
| [스파르타] 웹 프로그래밍 A-Z 기초 2주차 (완강) (0) | 2021.12.15 |
| [스파르타] 자료구조, 알고리즘 1주차 (완강) (0) | 2021.12.14 |


